Showing posts with label crafts. Show all posts

Friday, February 19, 2021

Envelope Art - Elder Stowell Edition

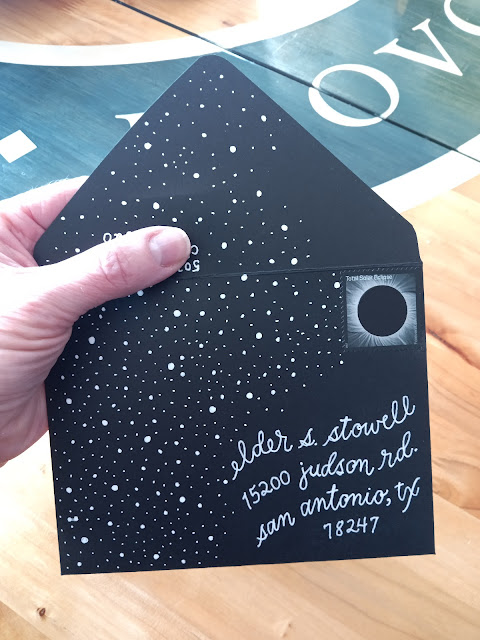
Since I made a goal to decorate one envelope each day in February, one of the hardest parts is deciding who to address it to each day. Sterling, a missionary for the Church of Jesus Christ of Latter-day Saints, has become my default. Here are most of the envelopes I've addressed to him so far this month. I like some better than others. As I said the other day, done is better than perfect. Without that mentality I'd be paralyzed and never able to start, let alone finish, each envelope. 

For this group, I can't decide if I like the first or the second one best. On the first one, I love the lettering, the orientation, and the color scheme. The second one was fun to make as it illustrates the journey from our home to his, with a Texas stamp to complete the look. The other envelopes are relatively simple; they are more about the stamp and how it fits with the design. A couple of these ideas were inspired by designs I saw on Pinterest or The Postman's Knock, but most of them I came up with on my own.

I mailed one of these to Sterling today. The rest I've set aside and will mail one at a time over the next several weeks. 

I sure hope Sterling likes mail!! :)


Wednesday, February 17, 2021

Envelope Art Preview

For the past few years, I've enjoyed making fun envelope designs incorporating fancy lettering and various stamps. Because February is traditionally my least favorite month (how can 28 days feel sooo long??), I challenged myself to decorate one envelope each day this month. I had fun with today's design so I wanted to share. It's not completely finished because I don't know who I'm going to send it to, so I'll have to add the name and address later. 

Like many of my projects, there are things I'd do differently if I had to do it over again, but done is better than perfect so here you go! I'll share a few more of my creations before the month is through.


Monday, December 24, 2018

Merry Christmas 2018

The Stowells are alive and well. It's been a good year and we have so much to look forward to! Our two missionaries will both come home in 2019 and, if all goes well, Sterling will graduate from high school a year early in May. It's possible that I could have 4 kids at BYU in January 2020!

With our missionaries out, I couldn't get a family picture this year. I could have pieced together a Christmas card with everyone here and there, but I wanted us all together so I hatched a plan that worked out beautifully!


Isn't that awesome? I commissioned Sadie's 13-year old friend, Jack, to draw our family picture and I am so happy with how it turned out. The word "Christmas" is something I doodled on the back of my church program a couple weeks ago and my friend, Jen, digitized it for me. (Jen and I have started a little Etsy shop with these digitized files -- I'll blog more about that later!)

I was a little worried about getting the cards out before Christmas. I received the finished drawing on Sunday, December 16th and had the card designed and ready for the printer on the morning of the 17th. The week before Christmas felt like a bad time for a rush order at the printers, but I walked into my favorite print shop at 9:20 Monday morning and, literally, walked out at 9:30 with a stack of 90 cards -- printed, cut and shrink wrapped! It was a happy little miracle and my cards were in the mail Monday afternoon.

Life is good! We have been so blessed and can see God's hand in our lives on a daily basis. We are grateful for the Savior and the opportunity to celebrate His birth.

Merry Christmas!

Tuesday, February 28, 2017

February Everyday

Last February I decided to post a blog entry every single day to help me focus on happy things during my least favorite month. Well I did it again. I didn't make a big deal about it because, honestly, I didn't know if I'd remember to do it. There have been several nights where I've been ready for bed before I remembered I still needed to post something. Argh! But somehow I pulled it off and it helped me find joy in the little things. I hope you've found many happy moments in your February, too. 

For this last day, I've got something that's sure to make you smile. This little donut was made entirely by Sadie. She got a little stitching kit for Christmas with patterns and supplies to make all sorts of mini food items. She hand stitched this adorable donut and made it entirely from scratch. Isn't it the cutest? 


On that note, I'll sign off and see you next month!

You know, February really isn't all that bad. ;)

Saturday, February 18, 2017

Pixelated Ponys

What can you make with a shoebox full of pony beads, some wooden skewers and floral foam blocks? Pixelated pony bead art! Soren and Sadie made good use of their supplies this afternoon as they put them together to make these fun pictures. Sadie sketched out her design on graph paper first. Soren relied more on trial and error. I think they both did a great job and had a lot of fun in the process. 

Soren's mushroom and Sadie's emoji

Sunday, February 14, 2016

Happy Valentine's Day!


Isn't this the cutest? I found the idea here. I don't have a color printer so I did the next best thing - I put a piece of tracing paper over my computer screen and traced Yoda's outline and then colored it in. Yes, for real. Ha ha!! Desperate times (i.e., procrastination) call for desperate measures. My kids loved their Valentines, but Sterling informed me that Yoda's lightsaber glow stick is supposed to be green. Who knew? :)

I hope you had a great day!
XO

{Below, enjoy a little Valentine's Day fun from Studio C.}

Friday, January 29, 2016

A Quick Fix

When we were almost finished with my office/craft room makeover, I realized I hadn't planned for a place to sit. With counter tops instead of a desk, I needed taller chairs. Then I remembered some folding stools we had stowed away in the boys' closet upstairs. They were the perfect solution to our problem.


But if you look closely at the first stool, you can see a rip right in the center of the seat. That wasn't sitting well with me (no pun intended) in my brand new room. 


Fortunately, it turned out to be a super easy fix. After a quick run to the fabric store for a fun upholstery fabric and some 1/2" foam (about a $6 total investment), I just removed a few screws under the seat, removed the damaged vinyl, replaced it with the foam and fabric, and replaced the screws. It took about fifteen minutes (give or take) and I love how it turned out!


In case you're wondering, yes, I did the same thing to the other stool for a matching set. They look great!

Easy and inexpensive. My kind of makeover! :)


Tuesday, January 12, 2016

Before and After: My Office/Craft Room

Welcome to my office.


I know. It's a mess in this picture. Okay, it was a mess much of the time, really, but this was taken shortly before we started our room makeover project and you know how that goes. What's the point in cleaning up if you're just going to rip everything out anyway? 

Some serious crafting has happened in this room over the years. This is where I did all my vinyl lettering projects from the design to the finished product. This is where I made cards and paper projects and even, briefly, jewelry pendants. It stored my supplies from calligraphy to wrapping paper to fabric. Yes, it stored fabric, but I didn't sew in here. There just wasn't room - never a free flat surface big enough for a sewing machine and all that goes along with it. Whenever I needed to sew, I set up a card table in the living room. Lovely.

As grateful as I was to have my own place, it started to feel chaotic. Even when I cleaned it up, it just wasn't very inviting. So as summer was coming to a close, we decided to redo the office. It was a big project. We took everything out and started from scratch. 

We purchased and installed new cabinets in one day. Little did I know that I'd be grounded for two months while we waited for the counter top to come in! That was frustrating, especially because all the contents of my office were now in the music room...

The music room during the makeover.
This is what you saw as soon as you walked down the stairs. Ugh!

Finally, the counter top came in and we were able to finish. Here are some similar shots to show you before and after from a few different angles. Drum roll please...


Main view - BEFORE.

Main view - AFTER. (Cue choirs of angels...)

Looking in the doorway - BEFORE.

Looking in the doorway - AFTER.
 
Opposite wall - BEFORE.

Opposite wall - AFTER. 

Needless to say, I love how it turned out. It's so refreshing and calm. It's easy to keep clean because there's a place for everything. Plus I got rid of a lot of stuff in the process. You might have noticed we didn't repaint. I looked at a lot of different paint colors and realized I didn't love anything as much as what I already had. The contrast with the white cabinets makes it look so different and fresh.

It was definitely worth the wait! :)


Tuesday, December 15, 2015

Two Easy White Elephant Ideas

Spencer and his friends had a white elephant exchange over the weekend. I made up a couple of fun options for him to take. They were pretty simple to throw together so I wanted to share them. I realize not everyone has a vinyl cutter, but the lettering could have just as easily been done by hand.

On the lid of a small container

Inside: Rock, Paper, Scissors :)

These also made great teacher gifts a couple of years ago!

[The idea for the "tool kit" came from here. Savannah found the "chocolate emergency" idea on Pinterest.]

Thursday, November 12, 2015

Gratitude


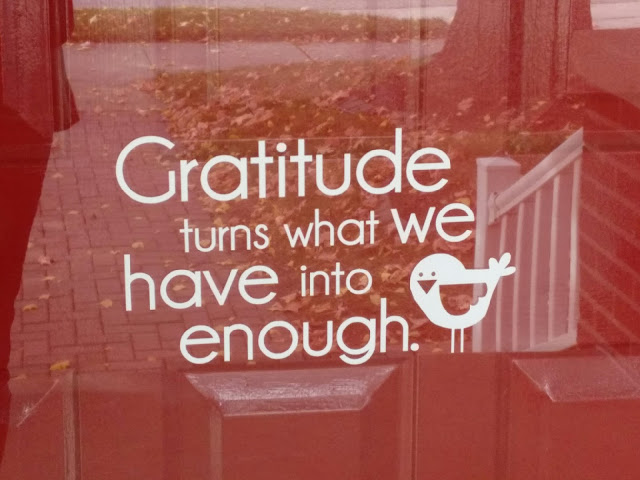
I thought my front door would be a great place to display my favorite gratitude quote. 

Gratitude turns what we have into enough. 

It really does!

Thursday, October 29, 2015

Pumpkin Color


Here's my contribution to Halloween.

I had some fun with a grown-up coloring contest. I figured a couple hours of coloring therapy was worth it for a chance to win a $100 gift card to a craft website. If nothing else, I got a fall decoration out of it. :)

We still need to make our mostly-annual sugar cookies and we have yet to carve a pumpkin, but there's a chill in the air and the trees are turning the most vibrant shades of yellow, orange, red and purple.

Happy Fall!

(2025 update: Sadly, the craft website I loved, consumercrafts.com, is no longer in business.)

Thursday, August 13, 2015

I'm Silently Correcting Your Grammar

Paul, a good friend of ours, is SO smart! He understands the English language so well that he's the perfect go-to source whenever there's a question about tense or capitalization or any number of tricky grammar situations. (I had to look up whether or not to capitalize "English" in the previous sentence. Paul would have known.)

Paul is also one of the funniest people we know. I've come to the conclusion that it's impossible to be around Paul for any length of time and be in a bad mood. 

When Jeff and I were invited to Paul's birthday celebration, we wanted to come up with the perfect gift. 


Shortly before we had to leave for the party, we remembered seeing a version of the above t-shirt online. Obviously, it was way too late to order one for Paul so I decided to make him one myself. After a quick run to the store for a t-shirt, I worked up a simple stencil with my vinyl cutter. A little bit of gray paint, a stencil brush and about 20 minutes later, we had our gift. 

Paul loved it! I think things are funnier when they are true. :)

Wednesday, August 12, 2015

Baby Shower Appliqué

My friend, Jen, threw a baby shower for a mutual friend. Jen is super fun and has so many great ideas. The decor was bright and cheery and the food was simple but yummy. The only thing missing was the typical baby shower games.

Jen hates those games. :)

Instead, she purchased baby onesies in various infant sizes from newborn to about 12 months. Thinking ahead, she got long sleeves in the sizes that would likely be worn during the cooler months and short sleeves for the rest. She laid out sets of cute coordinating fabrics, some pre-cut stencils and paper backed iron-on adhesive. That's where the party guests went to work.

We traced the stencils onto the adhesive paper (or drew our own design), ironed it onto the fabric of choice, cut out the shape, peeled off the paper and ironed it onto the onesies. It was pretty simple, but super fun! The finished onesies turned out so cute. I love how Jen had them displayed on the wall as part of the party decor.

I made the "Y" (for BYU, of course!) and the giraffe on the right.


Inspired by this project, Sadie and I decided to dress up her plain gray pajama shirt. We love how it turned out!


We went one step further and stitched around each piece...because one ear barely survived the washing machine. This photo was taken after two or three washings. It is holding up well.

Thanks, Jen, for the idea and the fun baby shower project!

Sunday, July 12, 2015

Double Digits

My baby girl is ten! How did this happen? I'm telling you, I've got to stop blinking!!

It seems like just last week she was making her grand entrance into the world. My mind is fuzzy on a lot of things, but I remember that night so clearly. We didn't know if we were having a boy or a girl and we were excited to find out. My doctor told me at my last appointment that, based on the way I was carrying and the heart rate, etc., he thought it was a boy. I love my boys, but we were really hoping for a little girl this time. We'd had her name picked out for six years and I just knew that there was a little Sadie meant to be a part of our family.

After Sadie was born, my doctor said, "I was just kidding. I knew it was a girl!" Very funny. :)

Brand-new baby Sadie with big sister Savannah. Savannah was so happy to finally have another girl in the family. 
Sadie has been so fun these past few months. She wants to learn everything! We got a new sewing machine and Sadie has been so patient trying to learn how to use it. My limited sewing skills are starting to come back and we've had fun figuring it all out. I'm super impressed with her first project: an adorable little stuffed horse. Sadie is a finisher and she whipped this thing out last week in only 2-3 days. Isn't it cute?


The birthday girl.
Sadie is also learning to crochet. She likes to help in the kitchen and she even likes doing laundry! She is organized and likes to get rid of things she doesn't use or need anymore. She's super funny and inquisitive. She loves to build puzzles and play games with me.  

I think we'll keep her! :)

Happy Birthday, my sweet Sadie-bug. I hope this is your best year so far!

Love,
Mum

Monday, April 6, 2015

The Best Easter Egg Award Goes To...

Soren's adorable and creative Penguin egg.
So we're a little slow when it comes to coloring Easter Eggs around here. Last year we never got around to it at all which makes me feel a little better about coloring eggs late in the afternoon on Easter Sunday!

We had a fairly limited color palette - blue, green, orange, and purple. Other than that, the kids were free to do whatever they wanted.

Soren easily won the "competition" with his penguin. It definitely has the "Awww" factor. Isn't it adorable?


And here are a few honorable mentions:

Sadie's cute happy face egg.
Spencer's creative drip dye technique.
Savannah's Ninja Turtle Egg
A shout out to our favorite school. Go BYU!

Saturday, March 21, 2015

Looking For A Mate

Finally, a solution to those single socks --

This is now hanging in my laundry room. :)

Trying to be funny, Spencer hung a picture of Savannah from one of the clips... (Okay, it was funny.)

Tuesday, January 27, 2015

Small and Simple Things

It's the little things that matter most. 

Soren loves the color green. He has several green shirts in his wardrobe, but none have been more loved than his robot shirt. He wore that shirt every chance he got. We aren't usually very sentimental, but once it was too small, we couldn't think of packing it up with the rest of our castoffs. Instead, we just tucked it into a drawer so Soren could save it forever. He loved it that much.

From a quick search through some old photos, I came across these two of Soren wearing his favorite shirt about 18 months ago. I realize you can't see the shirt very well in the first one (but look at that adorable face!), and the second one is super blurry, but you get the idea. 


Fast forward to Christmas. Sadie was making some simple sewing projects for the family and she just couldn't think of what to make for Soren. Then I had an idea. I had a small pillow form...and Soren had a shirt. It was perfect. I was so excited for him to open it on Christmas morning.


When Soren opened up his new pillow, he literally gasped! His reaction was priceless. He LOVES his pillow and was so happy to be reunited with his robot. It was the perfect gift. 

***

Side note: "Due to icy road conditions," we're enjoying Snow Day #4. The call came in during our family scripture study this morning at 5:50 and was completely unexpected. I think I like it that way best. It never crossed my mind that school might be canceled today so it was a fun surprise! 

Sunday, January 18, 2015

Don't Eat Pedro

After school started up again a couple of weeks ago, Sadie brought home a big stack of papers and projects from last quarter. One of these was a Thanksgiving project - Pedro, the Mexican Dancer. 

You see, Pedro is really a turkey who didn't want to get eaten on Thanksgiving day. Sadie's job was to disguise him to keep him safe. Each of my kids has had this assignment at least once over the years and we've come up with some pretty creative things - the Jedi and Princess come to mind, but I think Pedro is my favorite. 

It was a family assignment so I drew Pedro's outfit and sombrero and Sadie colored him and wrote the description (below) all by herself. It worked! Pedro survived. :)


I am not a turkey, I am a Mexican dancer. First, I have my mustache. Also, I have my big ruffley sleeves with all my bright colors. Next, I have my sombrero. I also have my share of beautiful dances. Do you like dancing? For me dancing is almost as beautiful as you, and almost as important as sleep. Hope to see you at my next performance if I'm still alive. Don't forget I am not a turkey. Sincerely, Pedro, the Mexican dancer.

Friday, November 8, 2013

Easy Peasy - Treat Box From a Paper Cup


I love cute and fun ways to package gifts. There's something cheerful about a little package containing a small treat to say "Thank You," "Get Well," or "I'm thinking about you!" I saw a picture of these adorable treat boxes and knew I had to try. These would make fun favors for a party. They would look so cute at each place setting for Thanksgiving or another memorable occasion. Bonus: They are super easy to make! Here's how...

I used paper cups from the dollar store. They came 12 cups to a package. Any paper cup should work. If you like, use cups with a pre-printed design or put on a fun sticker or something to fit the occasion. I added a "Y" sticker to mine because we're crazy about BYU around here. (Go Cougars!!)

Start by cutting the top white rim off the cup. Then cut slits down from the top, evenly spaced, all the way around. I cut mine just over an inch deep and I cut 8 slits. You can have as many tabs as you like, just make sure they are evenly spaced. Fill it with your treat then fold each tab down in order around the cup, tucking the last tab under the first. That's it. Super cute!