Showing posts with label decor. Show all posts

Saturday, February 6, 2021

Saving the Cake

Spencer and Grace were married in November. The cake was ordered a couple months in advance and it was our job to pick it up the morning of the wedding and deliver it to the home where the family celebration was to be held. Spencer told me he was excited to see the cake. He had given the bakery creative license and couldn't wait to see what they came up with. 

You can imagine my surprise when I looked in the box and found a plain white cake base. I told the baker about my conversation with Spencer and how he was expecting them to decorate the cake. She understandably looked horrified. It turns out it was just a big misunderstanding. Spencer thought he'd given them creative license, paid a deposit, and would pay the rest later. The bakery notes said he ordered a plain white base and had paid in-full up front. At this point, it didn't really matter who was right. I had a plain white cake base and limited time to drop it off and get to the ceremony. 

Several ideas popped into my mind during the drive and by the time we arrived, I had a plan. Grace loves poinsettias so we had those for some of the table decorations. They had curly gold things in them so we were able to use those as well as the flowers. I had some pretty gold ribbon with me, again for the tables, that we incorporated as well. Fortunately, the family whose home we were using knew that the sap of the poinsettias contains harmful chemicals so they advised us to wrap the poinsettia stems in plastic wrap so they wouldn't leak on the cake. Good save! 

Here's the finished cake. Not bad for a 10 minute decoration job, if I do say so myself. While Spencer eventually told Grace what happened, she had no idea during the celebration itself. Fortunately, this is the worst thing that happened all day and it wasn't even that bad. Whew!


Wednesday, February 1, 2017

Friends on Display

About half of our Christmas card wall.
I love our Christmas card display. In the weeks after Thanksgiving, it makes me so happy to check the mail and clip all the incoming Christmas cards to a wire that stretches the width of our dining room. While I don't really keep track from year to year, it feels like we got more cards than ever in 2016. Rather than overlapping and trying to fit them all in a row, this year after a row was full we just clipped additional cards in new rows beneath the first so they are all visible at once.

I know it's February, but I'm not ready to take the cards down quite yet. These are family and friends - most of them far away - and I like having them close to remind me how blessed we are!

Wednesday, December 14, 2016

Pasta Angels

I attended a writing group last night for the first time in several years. It was a blast! To start off, we were given twenty minutes to write on the prompt "Projects." We could interpret that however we wanted, from class projects to Christmas projects to the lack of projects, etc. Everyone was then invited to share what they wrote. Some were serious; most were funny. Here is what I wrote. It's a story worth remembering.

They were just the cutest little ornaments. The delicate angels looked like porcelain, but they were made almost entirely out of pasta. Bowtie pasta made the wings and dress, elbow macaroni formed the arms, and the little wooden bead head was covered in Acini de Pepe or what I call "frog-eye" pasta to look like curly hair. A few coats of white spray paint and a dash of translucent glitter was finished off with a little ribbon rose nestled in each angel's arms with a beaded halo on top.
I learned to make them at a church craft fair and decided I must make them for everyone I knew. How hard could it be? I started off just fine, but then the demands of the season started creeping in.
I was making them assembly-line style, one step at a time when I had a few minutes here and there. But then it came time to put the hair on my tray full of angels. For some reason this crippled me. It was the most tedious step and suddenly I felt overwhelmed. I put it off for days. One night I came home from a meeting and complained to my husband about all the demands on my time. I finished off with, "And I've still got to put hair on all of those angels!" At that, my husband of only six months said, "Come look at your hairless little angels." 
I walked over to the tray to find that my very masculine Jeff had laid aside his studies to spend the entire evening calmly and methodically spreading glue on my angels' little bald heads and then sticking them in the tiny pasta balls to cover every single angel head with hair.
That was 21 years ago, but I will never forget that selfless act of love.

Thursday, February 18, 2016

Before and After: My Dining Room Table

We have two dining room tables. When Sam and Savannah were at home, we used both tables, end to end, which comfortably fit all eight of us. Once Savannah left, we were able to go down to one table with the center leaf extended to make a square.

We weren't sure what to do with the table we weren't using anymore. The top of it was in pretty rough shape because our dining room is Grand Central Station around here. (Because we don't have an eat-in kitchen, our dining room table is used for every meal as well as homework, games, etc.) I had seen some fun stenciling ideas on the internet and my wheels started turning.  I figured I had nothing to lose so I decided to sand down the top and try out an idea.

This shows the contrast between the original table and what was underneath.
All sanded and ready to go!

December 24th was unseasonably warm so I was able to do all the sanding then. Unfortunately, the weather turned pretty cold after that so the newly sanded table sat in the garage for the next several weeks. (I'm a big wimp when it comes to the cold!) Last week, Jeff hauled the table in the house and set it up in the basement so I could finish my project.

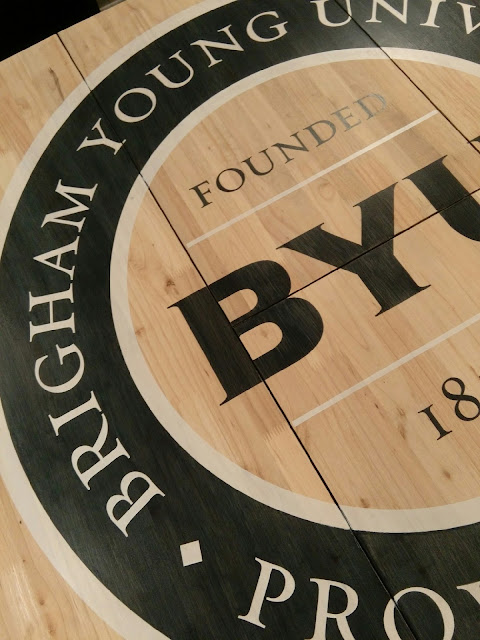
I used some old vinyl colors I never use and cut out huge stencils. Then I went to work with navy and white stain. I only have a couple of pictures of the process. In the first one, you can see why I had a hard time knowing if the blue was dark enough. The poor lighting and the contrast between the funky stencil colors and the navy stain was very misleading. I believe I added one more coat of blue stain after this picture was taken. Once the stencil was removed, the color really popped!


Almost done. All I had left at this point was to finish the white stripes on the right side and fill in a few more letters (University) with white.


And, as of about 9:00 this morning, here's the all-but-finished project. The only thing left to do is to finish it off with a few coats of polyurethane. Jeff is planning to do that this weekend.


A close up. I love how it turned out! 

Overall, the project was harder than I expected and I learned a lot along the way, but I love our one-of-a-kind table. Can you tell we love our BYU? :)

Thursday, February 11, 2016

Twenty-One Years Ago Today

Last night, Sadie told Jeff and me that we both had to wake her up in the morning. She said there would be a special surprise waiting for us and we had to come together.

As I started turning her door knob this morning, I heard her little voice, "Who is out there?"

"It's mom."

"Okay. Is daddy with you?"

"Yes."

"Okay. You can come in." We opened the door and she said, "Turn on the light."

As we entered her room, we saw our big surprise. There, on the wall above her bed, was this:


Unbeknownst to us, Sadie drew and colored each letter earlier in the evening and waited until Jeff tucked her in. Then she climbed out of bed and put up her sweet little masterpiece.

I'm glad someone around here likes to celebrate big events. Sadie doesn't get that from me, but it made Jeff and me feel like a million bucks that our engagement anniversary was so important to our cute little 10-year old girl.


Friday, January 29, 2016

A Quick Fix

When we were almost finished with my office/craft room makeover, I realized I hadn't planned for a place to sit. With counter tops instead of a desk, I needed taller chairs. Then I remembered some folding stools we had stowed away in the boys' closet upstairs. They were the perfect solution to our problem.


But if you look closely at the first stool, you can see a rip right in the center of the seat. That wasn't sitting well with me (no pun intended) in my brand new room. 


Fortunately, it turned out to be a super easy fix. After a quick run to the fabric store for a fun upholstery fabric and some 1/2" foam (about a $6 total investment), I just removed a few screws under the seat, removed the damaged vinyl, replaced it with the foam and fabric, and replaced the screws. It took about fifteen minutes (give or take) and I love how it turned out!


In case you're wondering, yes, I did the same thing to the other stool for a matching set. They look great!

Easy and inexpensive. My kind of makeover! :)


Thursday, July 23, 2015

It's the Little Things

Look at our sad, sorry curtain tie-backs. Aren't they pathetic? In the past, when the end loop has broken through, I just trimmed it and used the next row down. Over the years, they've broken so many times that I couldn't trim them anymore. Everyday it was an adventure just trying to find a loop that was still intact so I could open the curtains.


Finally, Sadie and I worked together to fix the problem. It took us an hour, maybe two at the most. Oh, what a difference! We should have done this months ago. 


Little things make a big difference!


Wednesday, October 1, 2014

Before and After: The Boys' Room

I finished up the boys' room redecorating project at least 2 weeks ago, and I'm finally sitting down to show you. I love how it turned out - super simple, bright and calm. That was my goal from the start: Calm. I wanted a room they could walk into and feel at ease; one where they could relax and feel at peace at the end of the day.

Now when I show you the before pictures, don't judge. It was particularly messy on the day I took these before pictures because I knew I was going to be tearing the room apart so I hadn't been on the boys to keep it clean. Don't get me wrong, it was usually busy and dark and cramped which is why we wanted to give it a makeover, but it wasn't usually this messy. I mean, I usually require that their beds are made! :)

Before:

Spencer's corner.


Sterling and Soren's bunkbeds.


Sam's loft bed over the dresser (we'd already removed the mattress).

After:

We got rid of all the beds, but kept the mattresses. We bought new beds with drawers. I love the look of the beds and I love that the boys have a place to put their stuff instead of on the floor. We painted the dark blue walls a soothing gray. I made them new comforters, adding a splash of color to each to personalize them a bit. We hung a mirror, clock, and pictures on the walls. The room is much simpler and yes, it is calm! I love it. The boys love it. Success!! :)

These are the two doorways that lead into the boys room and this dresser was beneath the loft bed.


One view of Spencer's corner.

Looking toward Spencer's corner from the head of Sterling's bed. One of the boxes at the end of Spencer's bed will hopefully be sorted through and gone soon.

Sterling's bed sits where the bunkbeds were originally. The magnetic strips under the windows might be used so I left them up.

Soren's bed is where the loft bed used to be. Ignore the upside down random family in the frames...
  
That's better. The final touch was to put the boys' pictures up.

Sweet dreams!

Monday, June 9, 2014

Sterling's Creation


Isn't this cool? Sterling made this in his art class at school. I've never seen anything quite like it so I wanted to share. Well done, Sterling!

Sunday, December 15, 2013

Before and After: Kitchen Backsplash

Jeff has done it again. I was more than tired of the wallpaper border along the backsplash of my kitchen. I really liked it at one time, but having served its purpose, it was time to go. I decided a while ago that I wanted to simplify and go with white subway tile in its place. After thinking about it for a long time and throwing some other ideas around, I always came back to that idea so we decided to just go for it. Once Jeff was on board, all it took was a few day off. Thanksgiving Break was the perfect time and Jeff got right to work. The entire project only took him a few days. Now my kitchen looks light and bright and clean and, well, it looks as if it was meant to have white subway tile all along! I love it!

Before:


During:

It only took me about 2 hours to strip off the border. Equal parts white vinegar and water worked like magic!


After:


Sunday, January 20, 2013

Looking Forward

January and February are not my favorites. There's too much cold and not enough sunshine. So, in an effort to find something to be happy about, I'm reminding myself that winter won't last forever. And if the coming spring is anything like last year (here and here), there is plenty of happiness to look forward to!

On my front door. :)

Until then, I'll remember this quote and do my best to be happy now:

All seasons are beautiful for the person who carries happiness within. 
--Horace Friess.


Friday, December 14, 2012

Easy Ornaments

I had a box of small colored ornaments that I bought 3-4 years ago for a project I never finished.

Determined to make use of them this year, I stole an idea from my friend, Marcia, and made the red ones into Santa's coat. So easy!! All it took was a small strip of black vinyl and a little gold buckle, also cut from vinyl, around the middle. The blue ones were just begging to be BYU ornaments so a simple Y was all that was needed.

Hooray for simplicity and using up what I had on hand. I love how they turned out. :)

Friday, December 7, 2012

A Christmas Greeting

So for the last 6+ years - since I got my vinyl cutter - I've kicked around the idea of coming up with a set of door vinyl that I could change out with each season or holiday. I finally got my act together when I put up my Halloween and Thanksgiving decor.

Here is what I came up with as a first greeting to visitors of our home through Christmas. Hopefully that star will remind people of the Savior, God's greatest blessing and the reason for the season.


Tuesday, October 23, 2012

My Attempt at Halloween Decor

I admit it, Halloween is not my favorite holiday. I don't hate it, I just don't see the point in spending a lot of money or time on it. We manage to throw costumes together every year mostly with stuff we have around the house (see a few of last year's costumes here, here and here), and we have had a total of approximately 7 trick-or-treaters come to our house in the past 13 years. It's kind of hard to get excited about that.

However, I finally put up one Halloween decoration for the benefit of our mailman and the 4 other people that might come to my front door between now and the 31st. (I didn't even design it myself. It's just a "Doodlebat" I found online.) Voila.


I feel much better now. :)

Thursday, September 27, 2012

Before and After: The Music Desk

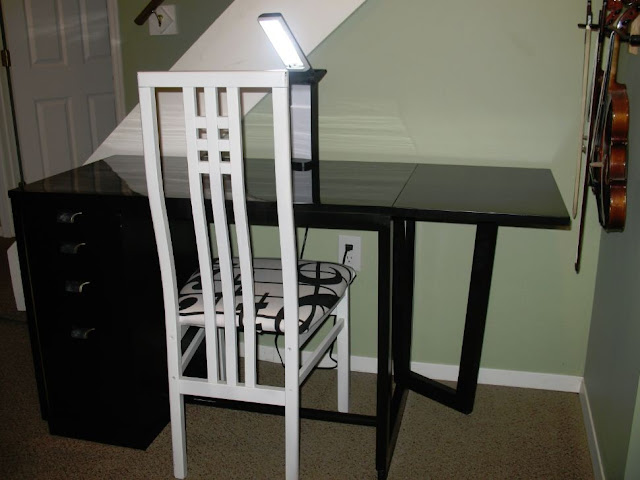
Way back here, I posted about Sterling's new desk and the chair I recovered to go with it. Several weeks ago, Jeff painted the desk a beautiful glossy black to match the piano on the opposite wall. I love how it turned out! Here are some before and after pics:

I didn't think to take these 'before' pictures until it was disassembled for the paint job, but you get the idea:

And after:
Jeff sanded the drawer pulls to reveal this brushed silver. Love it!
The extension on the right is a drop down panel. It's a great little desk!

Now I'm trying to come up with the perfect musical quote to go on the wall. Any suggestions?

Saturday, February 18, 2012

Before and After: The Music Chair

Today we bought Sterling a desk. He's been begging for one, saying he needs his own place to do homework and write music. A new home furnishings consignment shop just opened up in my little town and they had a desk that was just right. Jeff and I picked it up today and put it in the perfect spot in our music room. Once the weather warms up, we'll paint it a glossy black and it will look great with the piano in there. (That before and after will come later.) For now, the blonde wood finish will do and Sterling is completely thrilled with his new desk.

But the desk needed a chair. I gladly gave up an old dining room chair that's been taking up space in my bedroom. The seat was recovered several years ago to match some throw pillows that we don't use anymore and I was pretty sure Sterling wouldn't be thrilled with the floral print. What to do? Well, with an old white sheet, a vinyl stencil, some black paint and about 2 hours, here's what we came up with...

Before and After:


Pretty cool, eh? I'm always happy with a quick fix and Sterling loves it! Yippee!!


Monday, October 3, 2011

The School Library

Mr. Taylor, a favorite teacher of ours who has taught four of my kids, was asked at the end of last school year if he would consider taking on the role of school librarian.  Realizing this was an opportunity for a new challenge and a way to influence many more children, he accepted and got to work.  He spent many, many hours over the summer sorting books and decorating the library in his own style.  Because he has been teaching for 10 years, he has accumulated a lot of books.  The library has had a policy in the past that if a child forgets to return their library books, they cannot check out another.  Not ever wanting to deprive a child of reading, Mr. Taylor has placed his own books on a large cart so that children who forget to return their library books can choose one of his.  That's just the way he is.

This summer he approached me with a page full of quotes by authors or about books/reading.  He asked if I'd be willing to do vinyl lettering for them so he could hang them on the walls of the library.  I had fun working up each quote just the way I pictured it.  Mr. T framed them in paint splattered frames and they look great up on the walls. 


Blurry with a glare, but you get the idea.


I did the lettering on this bulletin board for Mr. T's classroom last year.  He saved it and has it up in the library as well.

The Elementary School Library is a cheerful place!  It was fun to have a part in that.  :)