Showing posts with label how to. Show all posts

Thursday, February 25, 2021

10,000 Things That Make Me Hungry


The goal was to update my recipe book. I wanted my grown kids to have access to their favorite recipes, but I also wanted to go through and remove recipes I never use, add in a few new ones, and update the recipes we know and love around here so that the instructions include all my shortcuts and modifications. It felt so overwhelming because, honestly, that job is never done. As soon as I finished printing an updated copy, there would be new recipes and further changes I wish were in there.

That's when I remembered my hungry blog! I started it in 2013, added a bunch of mostly main dish recipes in 2014, added six more in 2016 and one in 2017 and then forgot about it. But as I contemplated my recipe dilemma, I realized my blog is the answer. I can update and add to it anytime I want and no one has to print anything out or worry about it becoming outdated. 

And so in January I got to work. I made sure the recipes already on the blog were current. Then I put in almost all the rest of our tried-and-true recipes. I'll update it as I think of additions, and make changes as I find better easier ways to do things. ;) I've already been able to give out links to specific recipes upon request. It's so easy! 

So click here to enjoy my no-frills recipe blog. Please let me know if you find something you love!

Tip: in the desktop version, there is a search bar to hopefully help you find what you're looking for.

Monday, February 8, 2021

Family History Fun

Are you a FamilySearch fan? Have you ever tried any of the activities and games available? Here are three of my favorites:

In this one, you can put your face in an old photograph. There are options for men, women, or groups. We prefer the groups and Sadie especially has had fun with this one. Sometimes she'll replace her face for everyone in the photo like this (yes, those are all Sadie's face):


Or sometimes she'll just replace one face like this (this one is my personal favorite - Sadie put her face in for the child grasping the ostrich's neck. So funny!):


Anyway, click here to go to the website. Then select whether you want males, females, or groups. From there you just select the photo you want to put your face in and it will guide you through the process. Fun stuff!


2. Geneopardy

This game isn't through FamilySearch, but it will ask you to sign into your FamilySearch account because it uses your family history to ask you questions. So you get to know more about your history and what might have been going on in the lives of your ancestors. 


Make it a contest. Play with your siblings or kids and see who can get the most right. You can also choose how many generations you want the game to draw from. I've realized how little I know about the 5th generation and beyond.


If you click here, you'll go to a page full of various activities. Scroll down and click on Ancestor Challenge. This activity shows you ten photographs of ancestors, one at a time. For each photo, it will give you four names from your family history and you have to select the name of the person in the photo. Keep playing until you get 10 out of 10.


(Feel free to try out the other games and activites!)


I'm including this last one just for fun. It's not really a game, but when you sign in with your FamilySearch account, it will show you how you are related to all sorts of prominent people. Whether it's sports figures, presidents of the US, famous authors, or any number of other well-knowns, it's fun to see your connections. 

Have fun. :) And if you make any cool discoveries, I'd love to hear about it!

Thursday, February 4, 2021

Easy Cheesy Garlic Pizza Bread


This is one of our favorite quick meals around here. When the world shut down and the kids were home everyday, we must have eaten this for lunch at least 2 or 3 times a week! It's super easy to make and only takes about 10 minutes from start to finish. 

Easy Cheesy Garlic Pizza Bread

1 or 2 loaves Jimmy John’s day-old bread*

Butter or margarine

Garlic bread seasoning (Click here for the recipe)

Shredded cheddar cheese

Pepperoni

     Cut each loaf of bread in half lengthwise. Lightly butter each piece and sprinkle with garlic bread seasoning (substitute with garlic salt, if needed). Sprinkle with cheese and cover with a row of pepperoni slices. Place under broiler for 3-5 minutes, checking every couple of minutes, until the cheese is melted and starting to brown. Cut each piece into fourths. Serve warm.


*You can ask for "day-old" at Jimmy John's. At the location near us, which happens to be store #00001, it costs 50 cents a loaf and you can buy up to 4 loaves. Sometimes they sell out, but they seem to have it 90% of the time around here. If it's not available where you live, you can always use French bread or Italian bread loaves instead.


Thursday, November 30, 2017

A Shrimp Bug Contraption

You've probably never heard of a shrimp bug. That's because we made up the name. Years ago at certain times of the year, we would find these large bugs in our basement that sort of looked like a cricket, but they were brown with super long antennae and really long legs that could jump like 3 feet or more. They were terrifying. Their bodies sort of resembled a shrimp so we named them shrimp bugs and we all hated them. 


We later learned that they are actually called Camel Crickets, but we still call them shrimp bugs. We still get them. We still hate them. Unfortunately, we've had more than usual this year.

Sadie found one on the stairs last week after everyone had gone to bed. It was pretty late, but she was determined to make sure it wouldn't crawl (or jump!) into her room during the night. Here's the contraption she came up with:


You can see a few purple and pink ponytail holders on the stair behind the black folder. Sadie initially fired those at the bug to see if she could just annihilate it outright. It never moved so she thought maybe it was dead. See the markers and highlighters under the tub against the wall? She tried those next, throwing them at the shrimp bug which annoyed it enough that it crawled up the wall. She trapped it against the wall with the plastic tub, but then she was stuck. She couldn't let go or the tub would fall. She reached as far as she could and was barely able to grab Sterling's music folder which she propped against the bucket while she ran for tape. Once she secured the bucket to the wall, she kept the folder there for extra support then put her trash can next to that for added peace of mind. 

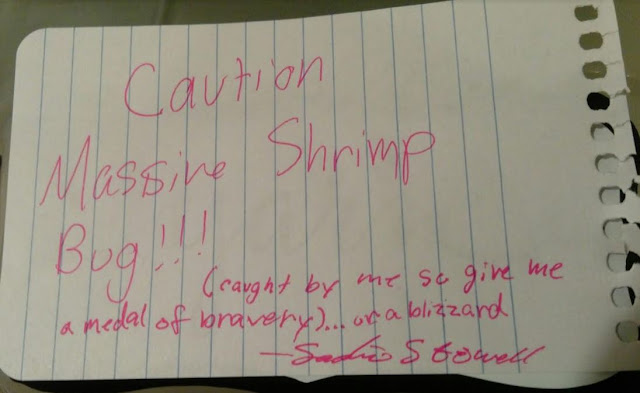
When I went downstairs the next morning, this note was on top of the bucket:

"Caution Massive Shrimp Bug!!! (caught by me so give me a medal of bravery)... or a blizzard  -Sadie Stowell
What a funny girl. :)

Fortunately for us all, camel crickets aren't invasive. They don't bite or get into food or otherwise cause trouble. They are just really big and ugly and terrifying. Sadie is the only one who sleeps in the basement and that's the only place we've found them, but I'm not worried about her. She's obviously got it under control.

Wednesday, March 1, 2017

How To Change the World

It turns out changing the world isn't as daunting as it seems. Here's a quick tip to get you started in that direction.


I hope my kids are watching... ;)

{This message came from a longer commencement address with ten tips on how to change the world. The other tips can be found here - each tip is a separate video and they will play in order.}

Friday, February 3, 2017

The Lego Files


I know it doesn't look like much, but welcome to the Lego files. (Maybe I'll replace this with a better photo someday or maybe I won't. You get the idea.)

We have a LOT of Legos. Many of them are various colored bricks in buckets that the kids can use to build whatever their imaginations come up with. It was the sets that had me baffled. What do you do with the sets? The boys wanted to display them, fully assembled, on shelves, but we ran out of shelf space long ago. So we disassembled many of them and put them in big ziplock bags and stored them in tubs, but the tubs took up so much space and then it was "out of sight, out of mind" so they were basically forgotten.

One day, after the kids got some free pizza "kits" as a prize from our local library, I was looking at the small pizza boxes they came in and had an aha moment.

I ordered a bunch of 10" craft "pizza" boxes and a 9-cube storage shelf and put the kids to work. Each lego set was broken down and put in boxes. The biggest sets fill up two boxes each while some boxes contain 2 or 3 of the smaller sets. We labeled each box and indicated who it belongs to and stacked them up on the shelves. Now it's easy for the kids to find specific sets, plus they get the fun of rebuilding them whenever they want. The "Lego Room" stays cleaner and mom stays happier. It's a win/win. :)

Friday, January 20, 2017

Gratefulness

These are the top grateful words from gratefulness.io since they started last year.

Need more gratitude in your life? (Don't we all?) Gratefulness.io is the solution.

I get a text from them every evening asking, "What are you grateful for today?" I simply text back my reply. Each Sunday I get an e-mail telling me what I was grateful for that week. Not only that, but I can access my gratitude journal on the website at any time and read through everything I've been grateful for.

I started logging my gratitude on June 2 last year and now have hundreds of little things recorded that I wouldn't have otherwise thought about, like Sadie getting so excited about shaving her legs for the first time or chocolate cinnamon bears from the BYU Bookstore. :)

It's a great way to focus on the little things and to always search for something to be grateful for, even on days when it's hard. I've had a lot of those hard days over the past few months so gratefulness.io has been a blessing.

And that's something to be grateful for! :)

Tuesday, May 24, 2016

Just Picked

Straight from the garden this morning:


Ready for lunch tomorrow:

Two Batches of Freezer Jam!

Homemade Strawberry Freezer Jam just seems to taste better when you grow the strawberries yourself! The first time I made freezer jam years ago, we decided we'd never be able to eat anything else. It's so much better than anything you can get from the store. 

Here's the recipe I use:

Strawberry* Freezer Jam
2 c. pureed strawberries
4 c. sugar
1 Tbsp. lemon juice
Combine and stir very well. Let stand for 10 minutes.

In a small saucepan, combine:
3/4 c. water
1/3 c. pectin**
Stir constantly, over medium heat. Bring to a boil and boil for 1 minute. 

Pour pectin mixture into strawberries and stir for 3 minutes. Pour into jars (I use old Skippy peanut butter jars). Let stand for 24 hours before storing in freezer. 

One batch makes about 3 jars

*I've substituted peaches or I've used half strawberries, half peaches with great results. Other berries can be used as well. It's pretty versatile. 
**I get my pectin in Amish country, but I used to use a boxed variety (where I originally found the recipe) from a local discount grocery store. 


Monday, February 29, 2016

What Is That Thing?

Well, I did it! I managed to blog every day in February. I will admit there were many days where I just wanted to forget the whole thing, but it was good for me to come up with something happy every day. I'm glad I did it and I'm glad I have a record of all the little things I normally skip over. I'd like to get in the habit of posting more than before -- but not every day. :)

So for today, I thought I'd post something completely random and a little bit freaky. I found this in the far reaches of my freezer:


What on earth? Any guesses? 

My first thought was that one of my boys was trying to preserve some poor creature's skull. In my freezer. With the food. Ew. Then I thought it was an extremely old, forgotten snowball that someone intended to save so they could pull it out in July. As in last July. Which led to the thought that I really need to clean out my freezer more often.

Still unsure what I was looking at, I naturally put it back in the freezer. When I found it again a couple weeks later, my kids were home so I asked if they knew anything about it. Spencer was the one who solved the mystery of the frozen skull snowball. 

Dry ice. 

Spencer received a shipment of frozen mice for his snake that were packed in dry ice. Being the scientist that he is, he proceeded to conduct all sorts of cool experiments. When he was done, he had a few little chunks of dry ice left so he put them in some water and left them outside for a while. When he came back, the water around the dry ice was starting to freeze. He eventually put the remains in the freezer and forgot about it. 

Fast forward a few months... And that is how to make a skull snowball. :) 

{Happy Leap Day, by the way.}

Saturday, January 2, 2016

A Favorite Quote: Creation

Imagesource

"God left the world unfinished for man to work his skill upon. He left the electricity in the cloud, the oil in the earth. He left the rivers unbridged and the forests uncut, and the cities unbuilt. God gives to man the challenge of raw materials, not the ease and comfort of finished things. He leaves the pictures unpainted and the music unsung and the problems unsolved, that man might know the joys and glories of creation." --Thomas S. Monson

My sister-in-law sent me that quote a few weeks ago and I can't stop thinking about it. It goes right along with my renewed determination to create a clean*, happy, safe home for my family and to have my family take a large part in doing so. I love watching the transformation of a room from cluttered to clean and then keeping it that way. I have a completely different attitude about keeping our house clean and tidy. It's a pleasure, not a chore. I am doing less work and getting better results. I am much less stressed and I don't feel so overwhelmed. My only regret is that I didn't catch this vision years ago!

Of course, this also applies to other things as well, from our daily meals to other projects I have in the works. I'm realizing (remembering) how much I enjoy making things and what a blessing it is to create things for the benefit of my family. I'm also teaching them how to create things that benefit others. :)

*In keeping our house clean I have found help from several sources, but one that has given me a lot of motivation recently is flylady.net. I love her philosophy and her wisdom. While I don't follow everything she says, I have implemented many things over the past six weeks or so and it has made a big difference. The book Sink Reflections, which I found at the library, explains her system. The information is also on her website, but I found the book quite helpful in laying out her program and how it all works together.

Wednesday, July 15, 2015

11 Ways to Play the Violin

Sterling is at it again. I always know we're in for some good entertainment when Sterling disappears with the video camera. This kid is a one-man band. He is the writer, director, producer, cameraman, and actor all wrapped up in one clever (and handsome!) package.

Please enjoy his latest installment as he demonstrates several ways to play the violin.

Wednesday, January 21, 2015

Duolingo - I'm a Fan!


I'm learning Italian. I mean, why not? I read about duolingo.com and decided to check it out. It's pretty slick and completely free. I'm still a beginner, but I know quite a few foods, animals, common phrases, and some other basics. My memory is not nearly as good as it used to be so I do a lot of reviewing, but that's super easy to do with duolingo and they even make it fun. In only 5-10 minutes a day, I'm making some pretty good progress.

Here are some of the things I've learned:

I tuoi insetti sono nel mio piatto = Your insects are on my plate.
For obvious reasons, I am anxious to learn, I need a new plate. 

Io sono una tartaruga = I am a turtle. 
I am not making this up. That exact phrase was in one of my lessons. I have yet to learn My name is... or Where is the bathroom? but I can proudly announce to the Italian world that I am a turtle, just in case, you know, I ever become a turtle.

I know it sounds like I'm making fun. I'm not. These phrases are pretty memorable so they help me remember how to form the sentences as I substitute different words. And they make me laugh during my lessons which makes learning more enjoyable.

Two of my boys have joined in on the fun. It's great for kids because it's so easy to navigate and it begins with the basics then builds from there. Soren was working on German, but decided to switch to Spanish. Spencer is also learning Spanish and is doing quite well as it reinforces what he's been learning in school. We just realized that Spencer won't have room in his schedule for Spanish 3 next year, but he's committed to keep it up with duolingo instead.  

I don't get into all the social media sharing stuff, but there is a place where you can send messages to each other. Soren thinks this is pretty cool and makes sure I don't get left out...


Ah, what a funny kid! 

For the record, no one asked me to post about duolingo.com and I have nothing to gain by doing so. I'm just really impressed with it and have enjoyed my experience so far. It makes me happy. :)

Friday, November 8, 2013

Easy Peasy - Treat Box From a Paper Cup


I love cute and fun ways to package gifts. There's something cheerful about a little package containing a small treat to say "Thank You," "Get Well," or "I'm thinking about you!" I saw a picture of these adorable treat boxes and knew I had to try. These would make fun favors for a party. They would look so cute at each place setting for Thanksgiving or another memorable occasion. Bonus: They are super easy to make! Here's how...

I used paper cups from the dollar store. They came 12 cups to a package. Any paper cup should work. If you like, use cups with a pre-printed design or put on a fun sticker or something to fit the occasion. I added a "Y" sticker to mine because we're crazy about BYU around here. (Go Cougars!!)

Start by cutting the top white rim off the cup. Then cut slits down from the top, evenly spaced, all the way around. I cut mine just over an inch deep and I cut 8 slits. You can have as many tabs as you like, just make sure they are evenly spaced. Fill it with your treat then fold each tab down in order around the cup, tucking the last tab under the first. That's it. Super cute!


Thursday, May 9, 2013

Recipe: Copycat Girl Scout Samoas in 15 Minutes or Less

You know those delicious coconutty Samoas (sometimes called Caramel deLites) the Girl Scouts sell? Yes, we love them, but they are somewhat pricey and, let's face it, the Girl Scouts only sell them once a year. So...I came up with a super simple little copycat version that will do in a pinch. These are pretty tasty. I don't know that I'd go so far as to say they are every bit as good as the real thing, but they come pretty close and you can keep the ingredients on hand in case of emergency. :) Jeff and the kids love them. I think they taste even better the next day - if they last that long!

Copycat Samoas or Caramel deLites
(makes about 30 cookies)
Only three ingredients:
One package Keebler Fudge Stripe cookies or store brand equivalent 
Kraft caramels (I used the caramel bits - way easier!)
Toasted coconut (I bought mine at a little store in Amish country, but you can toast your own if necessary)

1. Lay the cookies out, stripe side up, on wax paper.
2. Melt the caramel according to package directions. I used about half the package (approx. 5.5 oz.) and added 1 Tablespoon of water before melting for 30 seconds in the microwave.
3. Spoon or pipe caramel in a ring on each cookie. It does not have to be thick enough to cover the entire top, but you can use as much as you like.
4. Push each cookie, caramel side down, into the toasted coconut. This will smoosh the caramel out to cover the top.
5. Enjoy!

I put the melted caramel into a piping bag which made it super easy!


Wednesday, March 27, 2013

Easter Story Eggs

Several years ago, a friend gave me a set of Easter Eggs that contain the Easter story. Each year, my kids - especially the youngest ones - love opening each egg in turn, finding out what is inside, and reading the applicable scriptures to find out how each item relates to the real meaning of Easter. This year I decided to give the eggs a little update and face lift.


There are several versions of this activity online. I used what I was originally given and tweaked it a little here and there to include an extra verse or two. Our original set was in large, colorful plastic eggs. I switched to these white eggs I found at a craft store. I love their simplicity and that they fit in an egg carton. :)

Here are the scripture references and what is inside each egg:


{If you would like a document with all of the scriptures typed out, let me know in the comments and I'll e-mail them to you. (Be sure to include your e-mail address if I don't already have it.) Happy Easter!}

Monday, March 25, 2013

Recipe: Hot Buttered O's


We're snackers around here. We love to munch on popcorn, chips and salsa, pretzels, nuts...you name it. One of our favorite snacks is Hot Buttered O's. Never heard of them? You're in for a treat. Super easy and quick, these are our go-to snack for movies and games in a pinch. Love them!

Hot Buttered O's (my version)
6 cups Cheerios or store-brand equivalent
4 Tbsp. butter
Salt, to taste

In a 5 qt. saucepan (we use our Whirly-Pop), melt butter over medium heat. Add cheerios and stir constantly until they start to look toasty (or keep them on the heat longer if you like them a little darker like my dad.) Add salt, to taste, as you stir.

For a super delicious salty/sweet variation, melt 4-6 oz. of almond bark and stir it into prepared Hot Buttered O's.

Oh. Yum.

Thursday, March 21, 2013

For Grandma's Fridge

I made these magnets for Jeff's mom and dad to hold up the grandkids' pictures on their refrigerator door. In true make-it-work-while-on-a-mission fashion, they were using one of those flexible advertisement magnets that had been cut into little strips to do the job. It worked fine, but I couldn't resist cheering it up a bit. I have been anxious to try out my new Washi tape and I think it was the perfect choice for these scrabble tile magnets. You can't tell from the picture, but I coated the top with dimensional glue for a raised glossy finish then put super strong magnets on the backs. I love how they turned out!


Thursday, December 13, 2012

My Calendar: Due Dates

My to-do list usually looks like a big jumble of stream-of-consciousness tasks. On any given day it might say do laundry, make teacher gifts, return library books, make pie for ward party, and find a violin piece for Sam to play in church. A couple of those tasks might need to be done today, but most of them aren't pressing. The problem is, I look through my list and think, "I'll get started on teacher gifts," but I still have a week to finish those and the next thing I know, I owe a fine at the library and the boys have no clean socks!

I'm trying something new.

(I am the first to admit, this isn't rocket science. I'm sure I'm not the first person to ever think of this.)


I took a blank calendar page and filled in dates beginning with today. Instead of writing everything I have to do on one jumbled list, I wrote each on the day that it needs to be completed (the due date, if you will). Now I can look at the calendar and work on things in a sensible order. This morning I'll make pumpkin cupcakes with cream cheese frosting for Jeff's Pscychology Department Holiday Party. The recipe makes a ton so I'll save enough for the violin recital tomorrow - they're better the next day anyway and I will have killed two birds with one stone. :) I'll still tackle teacher gifts well before next Thursday, but at least I won't neglect the things that need to be done in the meantime.

I hope it works!

Now, if you'll please excuse me, I have to go make some Visiting Teaching gifts. I need them in an hour!

{If you have a great method of keeping things straight, please share in the comments.}

Wednesday, February 1, 2012

Cilantro Ice

We love cilantro around here.  Unfortunately, whenever I buy it from the store, so much of it goes to waste! The recipe I buy it for usually calls for a small amount and then, despite my good intentions to use up the rest, all too often it ends up going bad and ending up in the trash.

The answer?  Cilantro ice! I tried this as an experiment 2 or 3 years ago and it works like a charm.

Step one:  Chop up a bunch or two of cilantro.

Step two:  Place 1-2 Tablespoons of the chopped cilantro into each well of an ice cube tray and add just enough water to cover.
Step three:  Freeze. When completely frozen, pop the ice cubes into a ziplock freezer bag and store in the freezer until you need them.

When you have a recipe that calls for cilantro, add a cube or two or three...  The cubes will thaw as the other ingredients are added and stirred.  As my kids would say, it's easy-peasy-rice-and-cheesy!  Enjoy! :)