Showing posts with label projects. Show all posts

Tuesday, September 28, 2021

stowell.fami.ly

From 2008 to 2010, I had a blog called "Our Little Corner of the World," found at stowell.fami.ly. The posts contained loads of cute things the kids said and did, family outings, a few videos I liked - some funny, some inspiring - and a random assortment of other stuff. It was fun to go back and reminisce. 

As time went on, some of the settings on that blog became outdated or something because I could no longer access it. I was so sad! I didn't want to lose those memories. I checked back periodically, but I still got an error message every time I tried. I brought it up to my brother, Steve, who helped me get the blog started all those years ago, and he came to the rescue. He was able to change a few things to grant me access. Whatever he did changed the look of the blog to be very basic and I noticed a few posts were curiously missing, but I was grateful for the 70+ posts that I had access to once again. 

Because I don't want to risk losing everything again, I've copied and moved each post to this blog. I kept the dates the same so they appear from May 11, 2008 to Friday June 4, 2010. It's been a fun project full of smiles and memories. :)

Sunday, February 28, 2021

Making Peace With February

I don't know what it is about February, but it's my least favorite month. With rare exception, February always and ironically feels like the longest month ever. Plus, I hate to be cold and February is typically the coldest month of the year in my little corner of the world. When I get chilled, I don't want to do anything or go anywhere which makes the days feel even longer. 

Knowing my feelings for February, I decided to challenge myself to three things: 
1) Write a blog post every day (After my long hiatus from regular blogging, that's quite a feat!) 
2) Create one piece of envelope art every day
3) Read at least one chapter from a book each day 

Today is February 28 and guess what? Once I publish this blog post, I will have reached my goals! I can honestly say that having those three goals really helped; surprisingly, it didn't feel like a burden. Now that February is over, I'm hoping to post to my blog somewhat regularly. As for the envelope art, I enjoyed the creative process, but these past few days I've really struggled to come up with people to address envelopes to. So I won't keep that up, but I took pictures of every envelope I designed so it will be easy for me to recreate specific designs when I want to send something fun. And I hope to continue reading at least one chapter a day. In February, I finished reading "Mere Christianity," by C. S. Lewis and "Atomic Habits," by James Clear. I'm now reading "A Grief Observed," by C. S. Lewis which I should finish tomorrow. I just picked up some new books from the library so I have a few choices about what to read next. I love reading and I'm glad to get back into it. It's been a while since I've taken the time.

It's been a good month. Sure, we had our ridiculous cold spell where I just wanted to snuggle up on the couch all day, but I was grateful for the motivation to get up off the couch and do something. I'm just grateful I can finally say that February isn't all that bad. 

One of my favorite envelopes. My friend gave me the dancing stamps so I had to come up with an envelope to send to Sam, our ballroom dancer. He loved it! :)

Friday, February 19, 2021

Envelope Art - Elder Stowell Edition

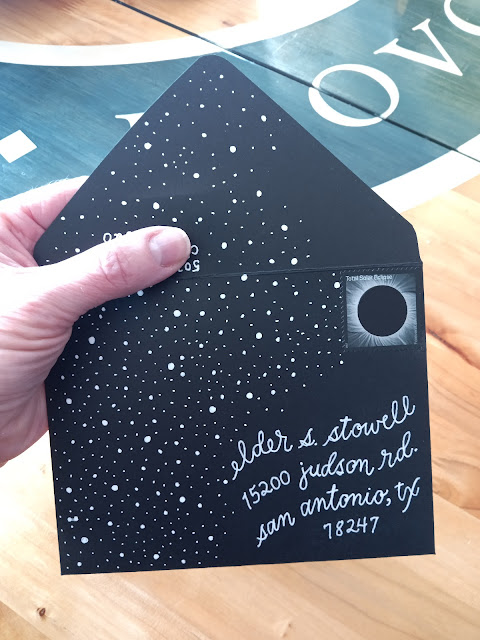
Since I made a goal to decorate one envelope each day in February, one of the hardest parts is deciding who to address it to each day. Sterling, a missionary for the Church of Jesus Christ of Latter-day Saints, has become my default. Here are most of the envelopes I've addressed to him so far this month. I like some better than others. As I said the other day, done is better than perfect. Without that mentality I'd be paralyzed and never able to start, let alone finish, each envelope. 

For this group, I can't decide if I like the first or the second one best. On the first one, I love the lettering, the orientation, and the color scheme. The second one was fun to make as it illustrates the journey from our home to his, with a Texas stamp to complete the look. The other envelopes are relatively simple; they are more about the stamp and how it fits with the design. A couple of these ideas were inspired by designs I saw on Pinterest or The Postman's Knock, but most of them I came up with on my own.

I mailed one of these to Sterling today. The rest I've set aside and will mail one at a time over the next several weeks. 

I sure hope Sterling likes mail!! :)


Wednesday, February 17, 2021

Envelope Art Preview

For the past few years, I've enjoyed making fun envelope designs incorporating fancy lettering and various stamps. Because February is traditionally my least favorite month (how can 28 days feel sooo long??), I challenged myself to decorate one envelope each day this month. I had fun with today's design so I wanted to share. It's not completely finished because I don't know who I'm going to send it to, so I'll have to add the name and address later. 

Like many of my projects, there are things I'd do differently if I had to do it over again, but done is better than perfect so here you go! I'll share a few more of my creations before the month is through.


Friday, October 6, 2017

Paint Louis


The city of St. Louis has a graffiti event every year, cleverly called Paint Louis. Graffiti artists paint sections of the flood wall south of the gateway arch.

Having previously studied this art form, a missionary serving in the St. Louis area decided last year that he wanted to be a part of the event. He was accepted to participate, received permission from his mission president and he and his companion got to work. The event was held a few weeks ago. I love how they were able to share their message in such a unique way. And I love the final result, right down to their graffiti "tag" in the top right corner.

Click here to read the whole story. It's pretty cool!

Tuesday, February 28, 2017

February Everyday

Last February I decided to post a blog entry every single day to help me focus on happy things during my least favorite month. Well I did it again. I didn't make a big deal about it because, honestly, I didn't know if I'd remember to do it. There have been several nights where I've been ready for bed before I remembered I still needed to post something. Argh! But somehow I pulled it off and it helped me find joy in the little things. I hope you've found many happy moments in your February, too. 

For this last day, I've got something that's sure to make you smile. This little donut was made entirely by Sadie. She got a little stitching kit for Christmas with patterns and supplies to make all sorts of mini food items. She hand stitched this adorable donut and made it entirely from scratch. Isn't it the cutest? 


On that note, I'll sign off and see you next month!

You know, February really isn't all that bad. ;)

Saturday, February 18, 2017

Pixelated Ponys

What can you make with a shoebox full of pony beads, some wooden skewers and floral foam blocks? Pixelated pony bead art! Soren and Sadie made good use of their supplies this afternoon as they put them together to make these fun pictures. Sadie sketched out her design on graph paper first. Soren relied more on trial and error. I think they both did a great job and had a lot of fun in the process. 

Soren's mushroom and Sadie's emoji

Tuesday, February 14, 2017

Be Mine, Valentine

While the drawing for this clever Valentine is my own, the cute idea is not. I love turtles so when I saw this idea on the internet, I knew it would be the perfect valentine for my kids.

Happy Valentine's Day! XO


Friday, February 3, 2017

The Lego Files


I know it doesn't look like much, but welcome to the Lego files. (Maybe I'll replace this with a better photo someday or maybe I won't. You get the idea.)

We have a LOT of Legos. Many of them are various colored bricks in buckets that the kids can use to build whatever their imaginations come up with. It was the sets that had me baffled. What do you do with the sets? The boys wanted to display them, fully assembled, on shelves, but we ran out of shelf space long ago. So we disassembled many of them and put them in big ziplock bags and stored them in tubs, but the tubs took up so much space and then it was "out of sight, out of mind" so they were basically forgotten.

One day, after the kids got some free pizza "kits" as a prize from our local library, I was looking at the small pizza boxes they came in and had an aha moment.

I ordered a bunch of 10" craft "pizza" boxes and a 9-cube storage shelf and put the kids to work. Each lego set was broken down and put in boxes. The biggest sets fill up two boxes each while some boxes contain 2 or 3 of the smaller sets. We labeled each box and indicated who it belongs to and stacked them up on the shelves. Now it's easy for the kids to find specific sets, plus they get the fun of rebuilding them whenever they want. The "Lego Room" stays cleaner and mom stays happier. It's a win/win. :)

Wednesday, December 14, 2016

Pasta Angels

I attended a writing group last night for the first time in several years. It was a blast! To start off, we were given twenty minutes to write on the prompt "Projects." We could interpret that however we wanted, from class projects to Christmas projects to the lack of projects, etc. Everyone was then invited to share what they wrote. Some were serious; most were funny. Here is what I wrote. It's a story worth remembering.

They were just the cutest little ornaments. The delicate angels looked like porcelain, but they were made almost entirely out of pasta. Bowtie pasta made the wings and dress, elbow macaroni formed the arms, and the little wooden bead head was covered in Acini de Pepe or what I call "frog-eye" pasta to look like curly hair. A few coats of white spray paint and a dash of translucent glitter was finished off with a little ribbon rose nestled in each angel's arms with a beaded halo on top.
I learned to make them at a church craft fair and decided I must make them for everyone I knew. How hard could it be? I started off just fine, but then the demands of the season started creeping in.
I was making them assembly-line style, one step at a time when I had a few minutes here and there. But then it came time to put the hair on my tray full of angels. For some reason this crippled me. It was the most tedious step and suddenly I felt overwhelmed. I put it off for days. One night I came home from a meeting and complained to my husband about all the demands on my time. I finished off with, "And I've still got to put hair on all of those angels!" At that, my husband of only six months said, "Come look at your hairless little angels." 
I walked over to the tray to find that my very masculine Jeff had laid aside his studies to spend the entire evening calmly and methodically spreading glue on my angels' little bald heads and then sticking them in the tiny pasta balls to cover every single angel head with hair.
That was 21 years ago, but I will never forget that selfless act of love.

Saturday, December 10, 2016

A Soft Bed for Jesus

For the past three weeks we've drawn names every Sunday. During the week we do nice things for our person. For each act of service, we get to put a straw in our popsicle-stick manger. We're trying to make a soft bed for the baby Jesus before Christmas.

Some of us are doing really well (some not so much, like...um...whoever has my name). Some of us are excited to find opportunities to secretly do something without getting caught while others ask "Who has my name?" when they have a job to do, hoping their someone will volunteer. :) As you can see, it's far from perfect. But overall, it's a positive alternative to the gimme attitude that all-too-often prevails at this time of year.

And our little makeshift manger is filling right up!


Wednesday, December 7, 2016

Nephi and the Brass Plates by Sam

Sam went all out on his final project for his religion class at BYU. This Lego stop-motion film was quite the undertaking! Even if you're not familiar with The Book of Mormon, you'll love this clever rendition of one of the best known Book of Mormon stories - Nephi and the Brass Plates. If you want to read the story, it starts here in 1 Nephi chapter 3. (Click next at the end of the chapter to finish reading the story in chapter 4.)

You're going to love this!! :)

Thursday, April 28, 2016

Shrek: The Musical

It's that time of year again. Our high school will be putting on their spring musical next week! This year I was again in charge of getting the t-shirts. It was pretty easy this time around because I was given a logo pack to use so I didn't have to design anything other than adding the school name and dates.


Spencer is playing the part of Pinocchio, one of the fairytale creatures. They were given old suitcases for one of their props and told to take them home and make them fit their specific role. Here is what Spencer started with:


Because Pinocchio is made of wood (despite his insistence that he's a real boy), a wooden suitcase was the logical design. Here's what we came up with:


I helped him come up with the design and my friend generously donated wood grain contact paper she had left over from another project. Spencer did most of the work himself. He did a great job!

Sterling will be the violinist in the pit orchestra. That's something he's always wanted to do, but the score hasn't included a violin part for the past several shows. He's been practicing hard and is excited to be involved.

If you're anywhere near my little corner of the world, come on out for the musical! If past years are any indication, you won't be sorry. It's always top notch and loads of fun! Feel free to contact me for information.

Saturday, March 5, 2016

Before and After: A Bathroom Makeover

Last spring, we purchased a cute little two bedroom rental home. It's just down the street from us and didn't need too much fixing up. But the bathroom -- Ugh! It was so weird! It was just a really bizarre set up.

This is where I'd insert the before pictures...if we had any. Somehow we can't seem to locate the pictures we thought we took before Jeff started on this project, so let me try to explain what it looked like. (I'll add pictures if/when they turn up.)

The main part of the bathroom had a 1970's green tub and shower. The sink was okay, but was way too big for the space which put it too close to the gross toilet. There was a weird step to access the tub/sink/toilet area. The flooring was a hodgepodge of various types. The walls were a horrible yellow paneling below with something rather forgettable above. At most, the whole room is only about 8'x10', so it's pretty small. That includes three doorways. Two of them lead straight through from one bedroom to the bathroom to the other bedroom. The other leads into a closet.

Jeff tore everything out and started over. Here it is after he worked his magic...

This doorway leads into one of the bedrooms. Closet access is on the right.

This door leads to the other bedroom. The same closet access is on the left.

Doesn't it look great? It is SO much better than before and just right for the space. It feels open and spacious and bright and that funky step is gone. Jeff does great work!

The above pictures make me happy which is why this is on my blog. :) Yesterday the above "after" pictures became the "before" pictures...

Sadly, there was a fire yesterday. Here is the latest shot of the bathroom:


We've got our work cut out for us. The bathroom ceiling has a huge hole where the firefighters axed it open to cool off a hot spot. The fire burned in one of the bedrooms, but most of the home has smoke damage. Not to mention the 6 windows busted out to let the smoke escape.


The good news in all of this? No one was hurt. No one was home when the fire was discovered. Stuff can be replaced. It'll take some time, but we're still counting our blessings!

Friday, February 19, 2016

Sick Day

Sterling was feeling kind of crummy the other day. Something's been going around and while there's no fever or major symptoms, it just makes you want to curl up and stay home. So when the school nurse called, I didn't hesitate to bring Sterling home for the afternoon.

I thought maybe he'd snuggle in and watch a movie or read a book. Maybe he'd take a nap.

Nope. Not Sterling.

Something happens to this kid when the demands of school ease up for a bit. His creativity kicks in and he starts exploring new ideas. I could hear him upstairs playing with Legos and at one point I thought I even heard him playing the violin. I was impressed. Give Sterling a little down time and he'll entertain himself for hours.

The video below shows the result of his "sick day." Not bad for a couple hours of free time.


I should really keep him home from school more often... ;)

Thursday, February 18, 2016

Before and After: My Dining Room Table

We have two dining room tables. When Sam and Savannah were at home, we used both tables, end to end, which comfortably fit all eight of us. Once Savannah left, we were able to go down to one table with the center leaf extended to make a square.

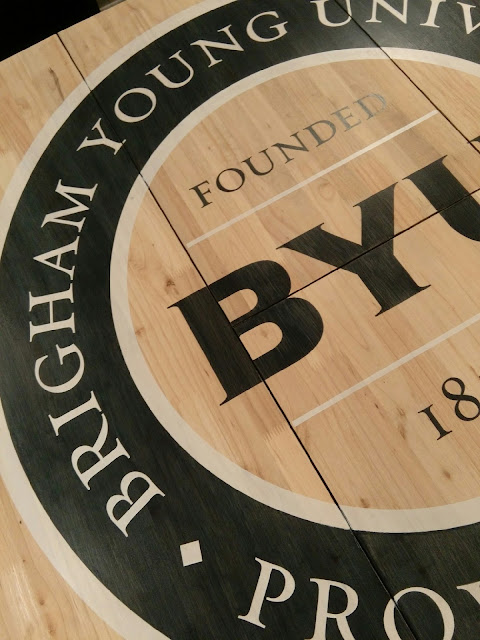
We weren't sure what to do with the table we weren't using anymore. The top of it was in pretty rough shape because our dining room is Grand Central Station around here. (Because we don't have an eat-in kitchen, our dining room table is used for every meal as well as homework, games, etc.) I had seen some fun stenciling ideas on the internet and my wheels started turning.  I figured I had nothing to lose so I decided to sand down the top and try out an idea.

This shows the contrast between the original table and what was underneath.
All sanded and ready to go!

December 24th was unseasonably warm so I was able to do all the sanding then. Unfortunately, the weather turned pretty cold after that so the newly sanded table sat in the garage for the next several weeks. (I'm a big wimp when it comes to the cold!) Last week, Jeff hauled the table in the house and set it up in the basement so I could finish my project.

I used some old vinyl colors I never use and cut out huge stencils. Then I went to work with navy and white stain. I only have a couple of pictures of the process. In the first one, you can see why I had a hard time knowing if the blue was dark enough. The poor lighting and the contrast between the funky stencil colors and the navy stain was very misleading. I believe I added one more coat of blue stain after this picture was taken. Once the stencil was removed, the color really popped!


Almost done. All I had left at this point was to finish the white stripes on the right side and fill in a few more letters (University) with white.


And, as of about 9:00 this morning, here's the all-but-finished project. The only thing left to do is to finish it off with a few coats of polyurethane. Jeff is planning to do that this weekend.


A close up. I love how it turned out! 

Overall, the project was harder than I expected and I learned a lot along the way, but I love our one-of-a-kind table. Can you tell we love our BYU? :)

Friday, January 29, 2016

A Quick Fix

When we were almost finished with my office/craft room makeover, I realized I hadn't planned for a place to sit. With counter tops instead of a desk, I needed taller chairs. Then I remembered some folding stools we had stowed away in the boys' closet upstairs. They were the perfect solution to our problem.


But if you look closely at the first stool, you can see a rip right in the center of the seat. That wasn't sitting well with me (no pun intended) in my brand new room. 


Fortunately, it turned out to be a super easy fix. After a quick run to the fabric store for a fun upholstery fabric and some 1/2" foam (about a $6 total investment), I just removed a few screws under the seat, removed the damaged vinyl, replaced it with the foam and fabric, and replaced the screws. It took about fifteen minutes (give or take) and I love how it turned out!


In case you're wondering, yes, I did the same thing to the other stool for a matching set. They look great!

Easy and inexpensive. My kind of makeover! :)


Tuesday, January 12, 2016

Before and After: My Office/Craft Room

Welcome to my office.


I know. It's a mess in this picture. Okay, it was a mess much of the time, really, but this was taken shortly before we started our room makeover project and you know how that goes. What's the point in cleaning up if you're just going to rip everything out anyway? 

Some serious crafting has happened in this room over the years. This is where I did all my vinyl lettering projects from the design to the finished product. This is where I made cards and paper projects and even, briefly, jewelry pendants. It stored my supplies from calligraphy to wrapping paper to fabric. Yes, it stored fabric, but I didn't sew in here. There just wasn't room - never a free flat surface big enough for a sewing machine and all that goes along with it. Whenever I needed to sew, I set up a card table in the living room. Lovely.

As grateful as I was to have my own place, it started to feel chaotic. Even when I cleaned it up, it just wasn't very inviting. So as summer was coming to a close, we decided to redo the office. It was a big project. We took everything out and started from scratch. 

We purchased and installed new cabinets in one day. Little did I know that I'd be grounded for two months while we waited for the counter top to come in! That was frustrating, especially because all the contents of my office were now in the music room...

The music room during the makeover.
This is what you saw as soon as you walked down the stairs. Ugh!

Finally, the counter top came in and we were able to finish. Here are some similar shots to show you before and after from a few different angles. Drum roll please...


Main view - BEFORE.

Main view - AFTER. (Cue choirs of angels...)

Looking in the doorway - BEFORE.

Looking in the doorway - AFTER.
 
Opposite wall - BEFORE.

Opposite wall - AFTER. 

Needless to say, I love how it turned out. It's so refreshing and calm. It's easy to keep clean because there's a place for everything. Plus I got rid of a lot of stuff in the process. You might have noticed we didn't repaint. I looked at a lot of different paint colors and realized I didn't love anything as much as what I already had. The contrast with the white cabinets makes it look so different and fresh.

It was definitely worth the wait! :)


Saturday, January 2, 2016

A Favorite Quote: Creation

Imagesource

"God left the world unfinished for man to work his skill upon. He left the electricity in the cloud, the oil in the earth. He left the rivers unbridged and the forests uncut, and the cities unbuilt. God gives to man the challenge of raw materials, not the ease and comfort of finished things. He leaves the pictures unpainted and the music unsung and the problems unsolved, that man might know the joys and glories of creation." --Thomas S. Monson

My sister-in-law sent me that quote a few weeks ago and I can't stop thinking about it. It goes right along with my renewed determination to create a clean*, happy, safe home for my family and to have my family take a large part in doing so. I love watching the transformation of a room from cluttered to clean and then keeping it that way. I have a completely different attitude about keeping our house clean and tidy. It's a pleasure, not a chore. I am doing less work and getting better results. I am much less stressed and I don't feel so overwhelmed. My only regret is that I didn't catch this vision years ago!

Of course, this also applies to other things as well, from our daily meals to other projects I have in the works. I'm realizing (remembering) how much I enjoy making things and what a blessing it is to create things for the benefit of my family. I'm also teaching them how to create things that benefit others. :)

*In keeping our house clean I have found help from several sources, but one that has given me a lot of motivation recently is flylady.net. I love her philosophy and her wisdom. While I don't follow everything she says, I have implemented many things over the past six weeks or so and it has made a big difference. The book Sink Reflections, which I found at the library, explains her system. The information is also on her website, but I found the book quite helpful in laying out her program and how it all works together.

Tuesday, December 15, 2015

Two Easy White Elephant Ideas

Spencer and his friends had a white elephant exchange over the weekend. I made up a couple of fun options for him to take. They were pretty simple to throw together so I wanted to share them. I realize not everyone has a vinyl cutter, but the lettering could have just as easily been done by hand.

On the lid of a small container

Inside: Rock, Paper, Scissors :)

These also made great teacher gifts a couple of years ago!

[The idea for the "tool kit" came from here. Savannah found the "chocolate emergency" idea on Pinterest.]